Binding Update: Sewing a Continuous Binding

This blog covers the final steps of doing a continuous binding when sewing it on by machine. This is another option to what we had previously presented in our 3 part Tutorials on Bindings. If you read our Tutorial Bindings Part 2: Mitered Bindings by Machine, you will begin and end differently than what’s presented. All other information is valid.
To make a continuous binding, lay your folded binding along your quilt top, but don’t begin sewing at the end of the strip. Start sewing about 10” – 20” away from the end, leaving a tail of 10” – 20”. The bigger the quilt, the longer the tail you want for maneuverability at the end.
Back tack when you begin to sew and at the end.
Getting ready.
From your excess binding, cut a piece that is longer than your binding’s cut width. (For example, if you cut your binding 2 1/2” cut your strip at least 3”. You want to easily be able to tell what was your binding’s cut width.) Open it up. We will use this for a quick binding measuring device (BMD).

From your excess binding, cut a piece that is longer than your binding’s cut width. Creating your quick binding measuring device - BMD.
Let’s begin
Lay your left-hand binding (LHB) tail along the raw edge of your quilt top. Lay your quick BMD on top of it, aligned with the right-hand edge.

Lay your left-hand binding (LHB) tail along the raw edge of your quilt top. Lay your quick BMD on top of it, aligned with the right-hand edge.
Lay the right-hand binding (RHB) tail along the raw edge of your quilt top and overlap the LHB tail and the quick BMD.

Lay the right-hand binding (RHB) tail along the raw edge of your quilt top and overlap the LHB tail and the quick BMD
Carefully get your scissors under the RHB tail and trim away the excess RHB tail along the edge of the quick BMD.

Carefully get your scissors under the RHB tail and trim away the excess tail of the RHB tail along the edge of the quick BMD.
Open up the LHB tail to expose the wrong side. Using a small ruler, draw a 45° line from the bottom corner up with an implement you can see on your fabric. My example is a dark green, so I used a white ceramic marking pencil.

Using a small ruler, draw a 45° line on the wrong side of the LHB strip from the bottom corner.
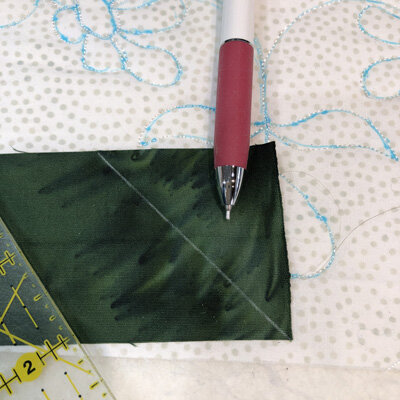
Showing line drawn with white ceramic marking pencil on dark green fabric.
Then, pin the right sides together of your LHB to your RHB to make a continuous binding strip. You’ll have to scrunch up your quilt top to give yourself the ease to do this. Be careful not to twist your binding strips.

Pin the right sides together of your LHB to your RHB to make a continuous binding strip.
Then go to your sewing machine and sew on the drawn line.

Sew on the drawn line

Once you are sure that you have sewed it correctly, trim the excess fabric down to a ¼” seam allowance.
Re-fold the binding, matching the raw edges. You will notice the seam allowance is hidden inside the fold.

Trim the excess fabric down to a ¼” seam allowance.

Re-fold the binding, matching the raw edges. You will notice the seam allowance is hidden inside the fold.
Pin binding to the edge of your quilt top and finish sewing it on by machine.

Pin binding to the edge of your quilt top and finish sewing it on by machine.
To finish, wrap the fold to the back and sew by hand or machine. You can refer to our Tutorial Bindings Part 3: Hand stitching Mitered Corners for more information on finishing by hand.
Tip: I have found that on small quilt pieces, like mug rugs (8” x 8”), this continuous binding technique is quite difficult because there isn’t much maneuvering room. Each binding tail ends up being only 4” each.I recommend you follow my original binding directions as presented in our Tutorials.

