Machine Reverse Applique - Part 4 of 5: Corners & Acute Points

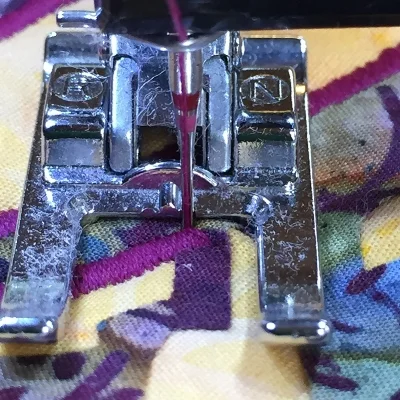
Thistle, 7 of 9 (16" x 16") in process of being machine reverse appliqued. Lots of acute inside points and corners to practice.
Welcome to Part 4 of our 5- part blog series on Machine Reverse Applique. Follow along and gain insight into how to prepare your piece and how to approach machine reverse applique to stitch with success. Become familiar with your sewing machine. Be aware of how you think about machine reverse applique. Learn tips for curves, circles, corners and acute points.
If you are just joining now, we invite you to go back and read Machine Reverse Applique Part 1 -Creative Possibilities, Part 2 - Stabilizing Your Fabric and Part 3 - Your Sewing Machine & You.
Machine Reverse Applique: Corners & Acute Points with the Satin Stitch
As a reminder, I’m someone who sews with the background fabric on my left and the top fabric on my right, which means the left needle position of the satin stitch goes into the background fabric, and the right needle position goes into the top fabric. You may want to reverse this, sewing with the right needle position of the satin stitch going into the background fabric and the left needle position going into the top fabric. Experiment to see what works best for you. However, this series of blogs will look at satin stitching with my way of sighting.

Left needle position of satin stitch goes into the background fabric, which is on my left as I sew.

Right needle position of the satin stitch goes into the top fabric, which is on my right as I sew.
Corners are 90 degree angle points
Each corner has two legs. One goes into it and the other goes out from it. We stitch into it on the first leg, pivot, and then stitch out from it on the second leg.

A shape from our Thistle, 7 of 9 pattern. Can you identify the 5 inside points and 1 outside point?
Inside corners
Inside corners are those points that are 90 degrees, like the corner on the inside of a box.
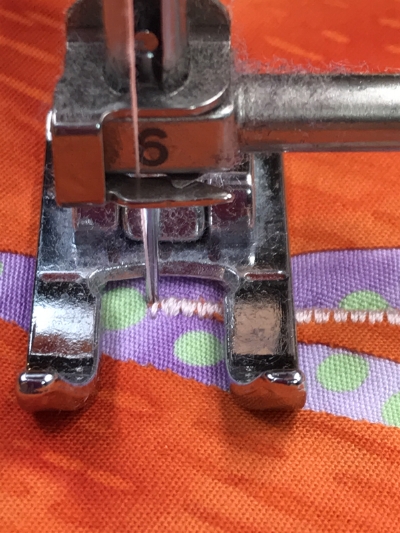
I stitch beyond the corner the same length as the width of my stitch. This is where having a feel for how wide your stitch is comes in handy. Typically that’s about 3 - 5 stitches +/- beyond the raw edge of your inside corner depending upon the width of your satin stitch. I end with my needle in the right hand position of the satin stitch.
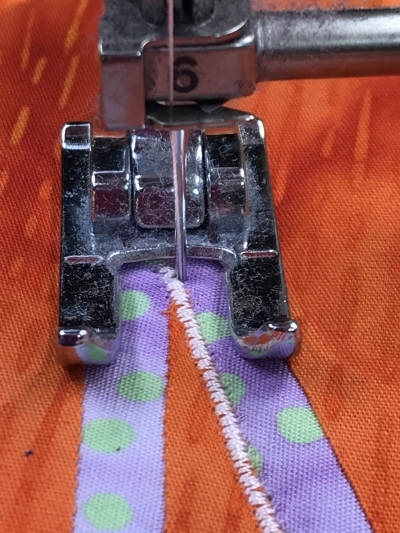
I leave the needle in the down position, raise my presser foot, and pivot my piece so my presser foot is parallel to the stitched leg of my inside corner, or perpendicular to the next leg to be stitched, and lower the presser foot to begin sewing.

1. Stitching beyond the raw edge of the inside point. End with needle in right hand position of the satin stitch.

2. Raise presser foot and pivot piece so presser foot is parallel to stitched leg and perpendicular to the un-stitched leg of the inside point.
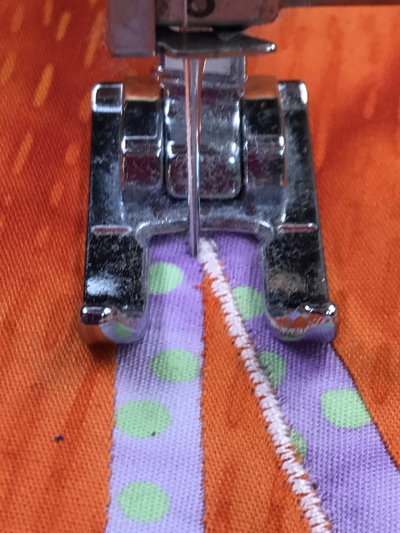
3. Lower presser foot. You are ready to sew.

4. Begin sewing.
Outside corners
Outside corners are those points that are 90 degrees, like the outside corner of a box.
I stitch to the corner leaving the needle in the left side of the satin stitch in the needle down position. Pick up the presser foot, turn your piece so the presser foot is parallel to the stitched leg of my outside corner or perpendicular to the next leg, the un-stitched leg, of the outside corner, lower the foot down, and sew.

1. Stitching to the corner. Leave needle down in the left hand position of the satin stitch.

2. raise presser foot in preparation for pivoting.

3. Pivot piece to the left so the presser foot is parallel to the stitched leg and perpendicular to the next leg. Sew.

4. Outside corner done.

Fleur de Lis block (10" x 12") used here in the center of a small machine reverse appliqued quilt.
Acute Points
Each acute point has two legs. One goes into it and the other goes out from it. We stitch into the acute point on the first leg, pivot, and then stitch out from the acute point on the second leg.
The challenge of acute inside and outside points is to stitch sharp, clean points that don't have "x-ed" tails or gaps at the point. Follow these steps and you will.
Acute Inside Points
Acute inside points are those points that are less than 90 degrees. I will use my practice piece layered for appli-quilting to demonstrate.
I stitch beyond the acute inside point the same length as the width of my stitch. This is where having a feel for how wide your stitch is comes in handy. Typically that’s about 5 stitches +/- beyond the raw edge of your acute inside point. I end with my needle in the right hand position of the satin stitch.
Raise your presser foot and pivot your piece to the right so the presser foot is parallel to the stitched leg.
Take one stitch so the needle ends in the left hand position of the satin stitch.
Raise your presser foot and pivot your piece to the right again so the presser foot is perpendicular to the second leg, the un-stitched leg, of the acute inside point. Put your presser foot down and sew.
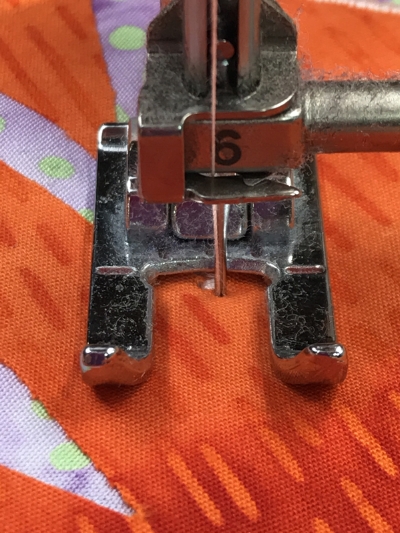
1. Stitch beyond the acute inside point 3 - 5 +/- stitches. End with needle in the down position on the right hand side of the satin stitch.
2. Raise the presser foot and pivot piece to the right so that the presser foot is parallel to the stitched leg of the acute inside point. Lower the presser foot.

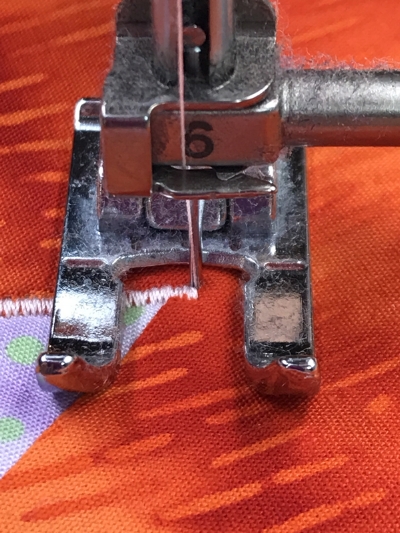
3. Take one stitch so the needle end s in the down position in the left hand side of the satin stitch. Raise presser foot.
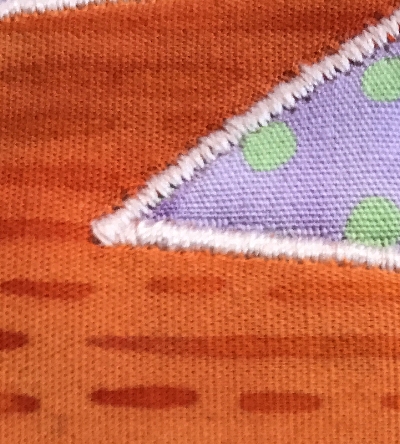
5. Acute inside point done. Stitches of the second leg overlap the stitches of the first leg without any "x-ed" tails at the point.

4. Pivot piece a bit more to the right so the presser foot is perpendicular to the un-stitched leg of the acute inside point. Lower the presser foot and sew.

Sweetheart Sorbet, Medallion XII (26" x 26") The valley between the bumps of the hearts give opportunity to gain proficiency with acute outside points. Note that we used two different thread colors to accent aspects of the design.
Acute Outside Points
Acute outside points are also points that are less than 90 degrees. I will use my practice piece layered for appli-quilting to demonstrate.
I stitch right to the acute outside point and end with the needle in the left hand position of the satin stitch, with the needle in the background fabric.
Raise your presser foot and pivot your piece to the left so the presser foot is parallel to the stitched leg.
Take one stitch so the needle ends in the right hand position of the satin stitch.
Raise your presser foot and pivot your piece to the left again so the presser foot is perpendicular to the second leg, the un-stitched leg, of the acute outside point. Put your presser foot down and sew.

1. Stitch to the end of the acute outside point and leave the needle down in the left hand side of the satin stitch.
2. Raise the presser foot and pivot your piece to the left so the presser foot is parallel to the stitched leg of the acute outside point.

3. Lower the presser foot and take one stitch so the needle is down in the right hand position of the satin stitch. Raise the presser foot.
4. Slightly pivot the piece to the left so the presser foot is perpendicular to the un-stitched leg of the acute outside point.
5. Lower the presser foot and begin to sew.

6. Acute outside point done. Stitches of second leg overlap stitches of first leg without any "x-ed" tails at the point.
See you next time, January 31, 2018, for Machine Reverse Applique - Part 5 of 5: Curves & Circles. Use what you've learned about your sewing machine and of Needle- Eye coordination and get tips on how to satin stitch smooth, evenly stitched curves and circles.

Make this cute Valentine's table decor set by machine reverse applique. Find out how in the blog "Feel the Love with Snowy Hearts".
Check out our blog "Feel the Love with Snowy Hearts" to create machine reverse applique place mats with appliqued reversible napkins to decorate your table for February. Its a small, fun project that gives you the opportunity to gain proficiency with the machine reverse applique techniques presented in this blog series using Snowy Hearts table runner IX.
If you are just joining now, we invite you to go back and read Machine Reverse Applique Part 1 -Creative Possibilities, Part 2 - Stabilizing Your Fabric, and Part 3 - Your Sewing Machine & You.
Visit the machine applique section of our shop for our unique reverse applique patterns for creating by machine.