Can you Baste by Machine?
Our hand reverse applique process has four steps. Trace, Baste, Snip & Stitch. The Basting and Stitching steps are both done by hand.
But customers in search of a faster way have asked if the basting step can be done by machine. So I’ve been experimenting to see if it works. The short answer is, “YES, You can baste by machine”.

The Basting is the Key to our Process
The basting step is a very crucial step to the whole success of the Trace, Baste, Snip & Stitch process. It transfers the design from the back, where we trace, to the front. So the accuracy of our basting is vital.
When we baste by hand we use a thick hand quilting or button thread in a contrast color to your top fabric and a thick No. 7 Sharps needle. We baste using a single thread in a running stitch. We begin and end our basting at the beginning and end of each shape in our pattern design. The needle and thread separate the fibers of our fabrics, creating little “holes” right on the design line of the pattern.

Close up of a hand basted section of Karen’s Hospitality table runner IV (20” x 52”). In process of needle turning at the basting line.
As we move onto the stitching step, this basted design and the “holes” made by the basting are all we have to keep our stitching true to the pattern design. These two benefits of the basting step are crucial to accurately reverse appliqué or appliqué your design.
To go from basting to stitching, the basting line is our sew line, replacing the basting thread with our stitching thread, one stitch at a time. How? Clip every other basting thread, pop one basting stitch out, sweep under the seam allowance of the top fabric, aligning it with the basting “holes”, and then sew it down to the background fabric right on the basting line. To find out more read our Technique Tutorial “Reverse Needle-Turn Applique by Hand- Using our Trace, Baste, Snip & Stitch Technique”.
Design Accuracy is Important When Basting. Should I baste by hand or machine?
One of the questions to consider is the intricacy of the design. Some designs are very detailed, while others are simpler. The other question to answer is how accurately can you baste by machine.
To experiment I began with simpler patterns with mostly straight lines in them. I machine basted our Karen’s Hospitality table runner IV (20” x 52”) pattern and the Star of Wonder (12” x 12”) block pattern from our book Christmas RAPPing, Christmas Quilts featuring Reverse Applique & Paper-Piecing.

Karen’s Hospitality table runner IV (20” x 52”).

Star of Wonder block (12” x 12”) from Christmas RAPPing.

When I basted Karen’s Hospitality, the first pattern I experimented with, I did some by machine and some my hand. This table runner pattern has long straight runs, a gentle curving frame and then lots of tight curves and points to appear like a wrought iron gate or fence. I decided to machine baste as much as I felt comfortable with: the gentle curving frame, the long straight runs, and any other straights I could. I decided I didn’t want to be twisting and turning all that fabric around to accurately baste the curves, so opted to hand baste the curvy elements of the design.

Karen’s Hospitality straights machine basted, curves hand basted. Viewed from the wrong side of the background. The back.

Karen’s Hospitality straights machine basted and curves hand basted. Viewed from the right side of the top. The front.
Machine basting the Star of Wonder pattern was easy because it was all straight lines.
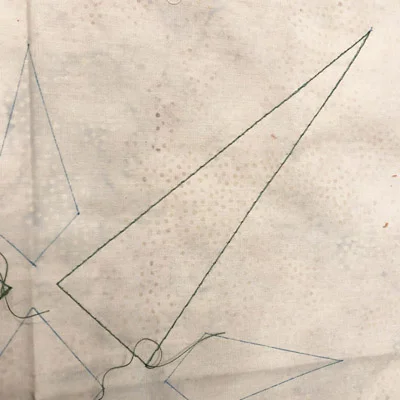
Star of Wonder machine basted viewed from the wrong side of background . The back.

Star of Wonder machine basted viewed from the right side of the top. The front.

Whirlwind Medallion VI pattern. Machine basted. Viewed from the right side of the top.
With those two successful experiments I next machine basted a curvier, more detailed design, our Whirlwind Medallion VI pattern (27” x 27”). It is mostly curves and points. I found it went quite smoothly. The center swirl is one continuous shape so I did not have any stopping and starting. It is not as big of a pattern as Karen’s Hospitality so I was not maneuvering lots of fabric either. It was all very manageable.
Creating these three designs I was able to accurately baste the pattern design by machine.
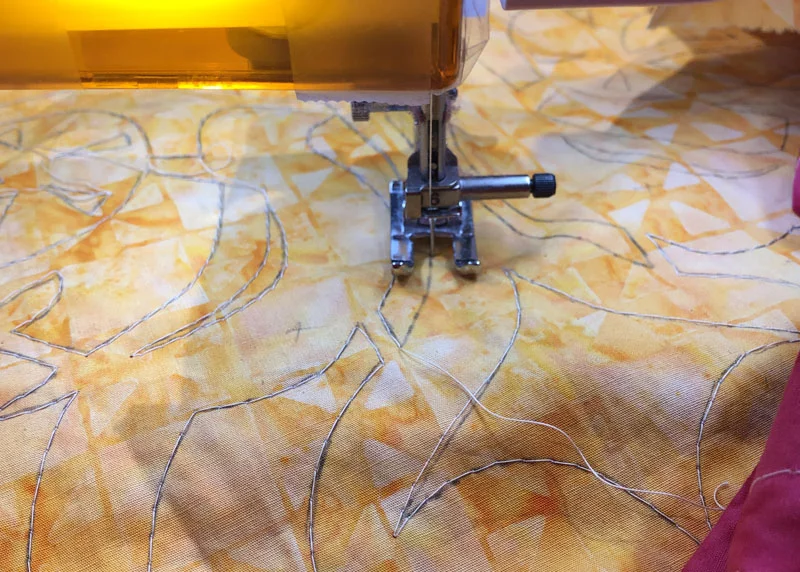
Basting by Machine
All the machine basting I’ve done is with my regular sewing machine with the feed dogs engaged. I put in a 90/14 sewing machine needle and used 40 weight thread. I set my stitch length to 5 (the longest stitch my sewing machine has), but sometimes adjusted it down to a stitch length of 4 so I could baste with accuracy. So, the intricacy of the design determined my stitch length - Too long and I lost the clarity of the design elements - Too short and the stitches were harder to clip and pop out as I stitched. Over time I’ve found that a stitch length of 3 - 3.5 mm is a good basting stitch length.
All my experimenting has been with batiks or tightly woven hand-dyes. To date I have not tried machine basting other types of fabric. At the beginning and end of each shape I am not backstitching to knot as I do when hand basting, but I am overlapping my stitches for about 1/2” and leaving a short thread tail. As when I hand baste, I do not carry my thread to the next shape.

Machine basted Whirlwind Medallion VI. Reverse needle turn applique in process.
Stitching Step on a Machine Basted Piece
When I was preparing my piece to hand reverse appliqué/ appliqué, I found it was best to clip about every 2nd or 3rd machine basting stitch. I clipped not only the top thread, but also the bobbin thread. When I only clipped the top thread I got tangled up in the ever lengthening bobbin thread on the back, and it was harder to pop the top thread stitches out. When I started clipping both threads these issues ceased to be a problem. The sewing machine needle left holes that I could see and use for stitching my design. When, at some points it was harder to find a hole, I had more holes to see to find the design line as the sewing machine made more basting stitches than when I hand baste.

Whirlwind Medallion VI, viewed from the top: every 3rd - 4th basting stitch clipped.

Whirlwind Medallion VI, viewed from the back: every 3rd - 4th bobbin stitch clipped.

Star of Wonder block viewed from the top: every 3rd - 4th basting stitch clipped.

Star of Wonder block viewed from the back: every 3rd - 4th bobbin stitch clipped.
Pros & Cons of Machine Basting vs Hand Basting
The biggest benefit to machine basting is that it is faster than basting by hand. I’m not yet convinced that this would be true for all designs, though. The more intricate and detailed a design is, the more likely it is that I will continue to do it by hand. Though I appreciate the speed that machine basting affords, it also means that I must be home and sitting at my sewing machine. With all the travelling I do this is not always feasible.
Machine basting is not always desirable to me either. I love the portability of my handwork and the time I get to spend with my friends and family when I baste by hand. I am also someone who finds peace and rest for my soul when I hand baste and hand stitch, and miss these benefits when I baste by machine.
I can imagine that if you were really good at free motion quilting, you could try machine basting with your feed dogs down and your free motion quilting foot on. Or if you have great control on a long arm machine you could try machine basting on your long arm. Just make sure your stitches are consistently long enough, and you are accurately following the pattern. (I have no personal experience with either of these, though, so if you opt to machine baste in either of these ways, please let me know how it goes.)
Consider machine basting as another tool in your quilting tool box. There are times and places to employ a multitude of approaches to the same task. Choose carefully, based on the pattern in front of you, which approach you want to use. And most important of all...Happy Quilting!
Hand Basting vs Machine basting Comparison
To hand baste I need a needle, thread and scissors. To machine baste I need a sewing machine along with the sewing machine needle, thread and scissors.
Hand basting is good for all designs of all sizes. Depending on your abilities, machine basting is better for simpler designs, smaller patterns, designs with lots of straights or gentle curves.
When we baste by hand we have a single thread to deal with. When we baste by machine we have two threads to deal with: the top and the bobbin thread.
Hand quilting thread for basting is a thick 28 wt. Sewing machine thread for basting is not as thick, only 40 - 50 wt.
We use a No. 7 Sharps needle to hand baste. We use a 90/14 sewing machine needle to machine baste.
A hand basted piece has “holes” about every 1/4” along the design line. A machine basted piece has a continuous line of “holes” along the design line.
When hand basting knot your thread at the beginning and end of each shape. When basting by machine do not knot at the beginning. Overlap your stitches at end of each shape and leave tails at the beginning and end of each shape.
When I hand baste I can sit with my family or take my project with me. When I machine baste I need to be home and sit at my sewing machine.
When preparing to stitch a hand basted piece clip every other basting stitch. When preparing to stitch a machine basted piece clip every 2nd or 3rd stitch of the top and the bobbin threads.